
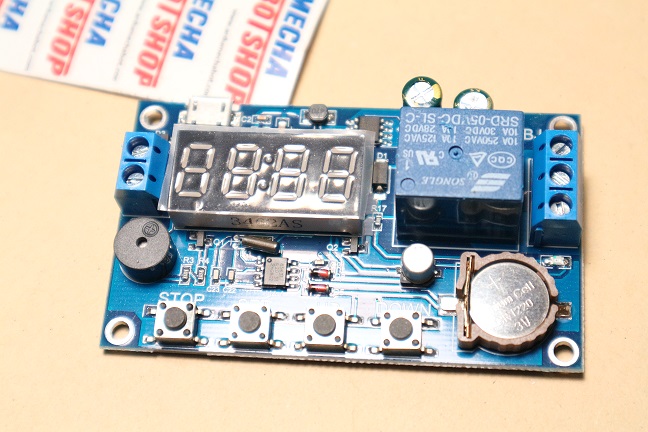
relay timing and clock synchronization / time control / delay 24H timing 5 time periods


| หมวดหมู่ | Relay Board |
| ราคา | 180.00 บาท |
| สถานะสินค้า | พร้อมส่ง |
| ลงสินค้า | 13 ต.ค. 2561 |
| อัพเดทล่าสุด | 13 ต.ค. 2561 |
| จำนวน | ชิ้น |

รายละเอียดสินค้า
Module highlights:
Wide voltage supply 5.0V--60V ;
A mode can set multiple time periods, which can reach 5 time periods;
With buzzer alarm function.
Introduction to functional mode:
OPE : Relay closing time CLE : Relay opening time
Time period: PE-1 to PE-5 , 5 time periods
" ----":function shielding
P-1: Daily OPE relay closed / output pulse CLE relay open /output pulse
P-2: day OPE relay closes / output pulse CLE relay OFF /output pulses
P-3: The day of the month : OPE relay closed / output pulseCLE relay open / output pulse
P-4: During the period from a few months to a few months, the starting point of each day, the end of the time: OPE relay closing / output pulse CLE relay disconnect / output pulse
P-5: The number of days to the beginning of the day starts at the beginning of the day, and ends at the end: OPE relay closed / output pulse CLE relay open / output pulse
First, how to set the time
In the time running interface, long press DOWN :
1. After the system flashes “ YEA ”, it will enter the time setting interface. At this time, two digits will flash after “Year”, and it will be adjusted by DOWN and UP(support long press);
2. Short press SET system to flash “ dAE ” and enter “Month / Day” setting interface. At this time, “Month” will flash continuously, and it will be adjusted by DOWNand UP (support long press);
3. Short press SET , then “Day” flashes, adjust throughDOWN and UP (support long press);
4. Short press SET , the system will flash to display 'HOU ' and then enter the “hour / minute” setting interface. At this time, “hour” will flash continuously, and it will be adjusted by DOWN and UP (support long press);
5. Short press SET , then “minute” flashes, adjust byDOWN and UP (support long press), press SET shortly , repeat step 1 ;
6. After long press SET release, the time will be modified according to the set parameters, and the time setting interface will be exited;
Second, how to set the parameters
In the time running interface, long press the SET button for2 seconds and then let go, the system enters the parameter setting interface:
Step 1: Select the time period: PE-1~PE-5 select by short pressing the UP and DOWN keys;
Step 2: Select mode: “ ---- ” P-1~P-5 (that is, set this time period to the corresponding mode) by short pressing theUP and DOWN keys to select ; ( “ ---- "" means to block this time period )
Note:
The repeat mode of each time period can be selected from "----", P-1~P-5; for example, it can let 5 time periods work in P-1 mode at the same time, or let the time period 1 works in P-1 mode, time 2 works in P-2 mode, etc.; very convenient and flexible, can be arbitrarily combined according to their own needs;
Step 3: After the mode selection is completed, short pressSET to enter the time period setting interface . In the time period setting interface, switch parameters by short pressing SET , “ OPE ” start time point, “ CLE ” end time point, “ dAE ” date information ;
Step 4: Exit the setting after the parameter setting is completed. Press and hold the SET button for 2 seconds torelease the hand. Check whether the parameter setting is legal. If it is legal, save the parameter and return to the time running interface. If the parameter is wrong, the “ERR ” reminder is displayed ( stop time / date) < = Start time / date is reported error ) Return to the parameter setting interface again ;
Note : Stop Time / Date ( CLE ) > Start Time / Date ( OPE)
Additional features: can be set separately for any time period
In the specific parameter setting interface (after the second step) , short press STOP to switch the output mode:
OUT1 : Start point conduction relay, end point disconnect relay
OUT2 : output 1S pulse at time
In the specific parameter setting interface (after the second step) , long press STOP to switch the ringing mode:
bLL0 : ringing is prohibited
bLL1 : ring enable
Note: After ringing, press any button to stop this ring
STOP button function extension:
Relay enable mode :
1. ON : The relay is turned on during the relay conduction time;
2. OFF : The relay is prohibited from being turned on and is always off.
Short press the STOP button on the time display interface to switch betweenON and OFF . The current state will flash and then return to the main interface.(This function is the emergency stop function, one button to open and close the relay)
After the relay is disabled, the alarm function is set when the mode is set.
Sleep mode :
1. CP sleep mode: within five minutes, without any operation, the digital tube automatically turns off the display, and the program runs normally;
2. Od normal mode: the digital tube always turns on the display;
In the time display interface, press and hold the STOP button for 2 seconds to release, and the CP and Od states are switched. The current state will flash and then return to the main interface.
วิธีการชำระเงิน
วิธีการจัดส่งสินค้า
ทางร้านส่งของทุกวัน
(แจ้งรหัสไปรษณีย์ทาง Email)
การส่งของ
1.ส่งแบบพัสดุลงทะเบียนจัดส่ง
2.ส่งแบบพัสดุ EMS
3.ส่ง J&T Express (ต้องมีผู้รับสินค้า)
เมื่อลูกค้าทำการโอนเงินแล้ว
กรุณาแจ้งชำระเงินทุกครั้งผ่านหน้าเวป หรือแจ้งที่ 084-6334610 หรือ Add line QR code ข้างล่าง
เพื่อความรวดเร็วในการตรวจสอบและกรุณาเขียนที่อยู่ในการส่งให้ชัดเจน ทางเราจะยืนยันการส่งของทางEmail ของท่านที่ให้ให้ไว้

ไปหน้าแจ้งชำระเงิน"กดคลิ๊กที่นี่"
**ขอบคุณที่ใช้สินค้าของเราครับ**
ชำระเงินผ่านธนาคาร
ชำระเงินออนไลน์
- ค่าธรรมเนียม 3.9% + 11 THB
- การชำระผ่าน PayPal คุณไม่จำเป็นต้องแจ้งชำระเงิน เนื่องจากระบบจะจัดการให้คุณทันที ที่คุณชำระเงินเสร็จสมบูรณ์
Join เป็นสมาชิกร้านค้า
Member
Link


